Saturday, March 1, 2025

HOW TO CALCULATE THE QUANTITY OF HOLLOW CONCRETE BLOCKS AND MORTOR IN WALL

Given,

Length of Wall = 6 m

Height of wall  = 3 m

Mortar Ratio    = 1:5

Thickness of Mortar = 25 mm

Size of Block = 400 mm x 150 mm x 200 mm


Solution:

Volume of Wall = L x B x H

                           = 6 x 0.15 x 3

                           = 2.7 Cum.


Volume of 1 Hollow Block = 0.4 x 0.15 x 0.2

                                                  = 0.012 Cum


Volume of 1 Hollow Block with Mortar = 0.425 x 0.15 x 0.225

                                                                               = 0.014 Cum.


Number of Hollow Blocks =                    Volume of Wall               

                                                Volume of 1 Hollow Block with Mortar

                                            = 2.7 / 0.014

                                            = 192.85

                                            = 193 Blocks.


Total Volume of Block = Number of Blocks x Volume of 1 Block

                                      = 193 x 0.012

                                      = 2.136 Cum


Volume of Mortar = Volume of Wall - Total Volume of Block

                               = 2.7 - 2.316

                               = 0.384 Cum ( Wet Volume)


Now convert Wet Volume in Dry Volume

Dry Volume of Mortar = 0.384 x 1.33  

                                              = 0.51 Cum.


Volume of Cement = ( Dry Volume x Ratio of Cement x Density of Cement) / Sum of Ratio

                                = ( 0.51 x 1 x 1440 ) / 6 

                                = 122.4 Kg

Cement in Bags     = 1224.4 / 50

                                = 2.4 Bags


Volume of Sand  = ( Dry Volume x Ratio of Sand ) / Sum of Ratio

                                  = ( 0.51 x 5 ) / 6 

                                 = 2.55 Cum

Sand in CFT       = 2.55 x 35.3147

                                = 15.008 CFT.

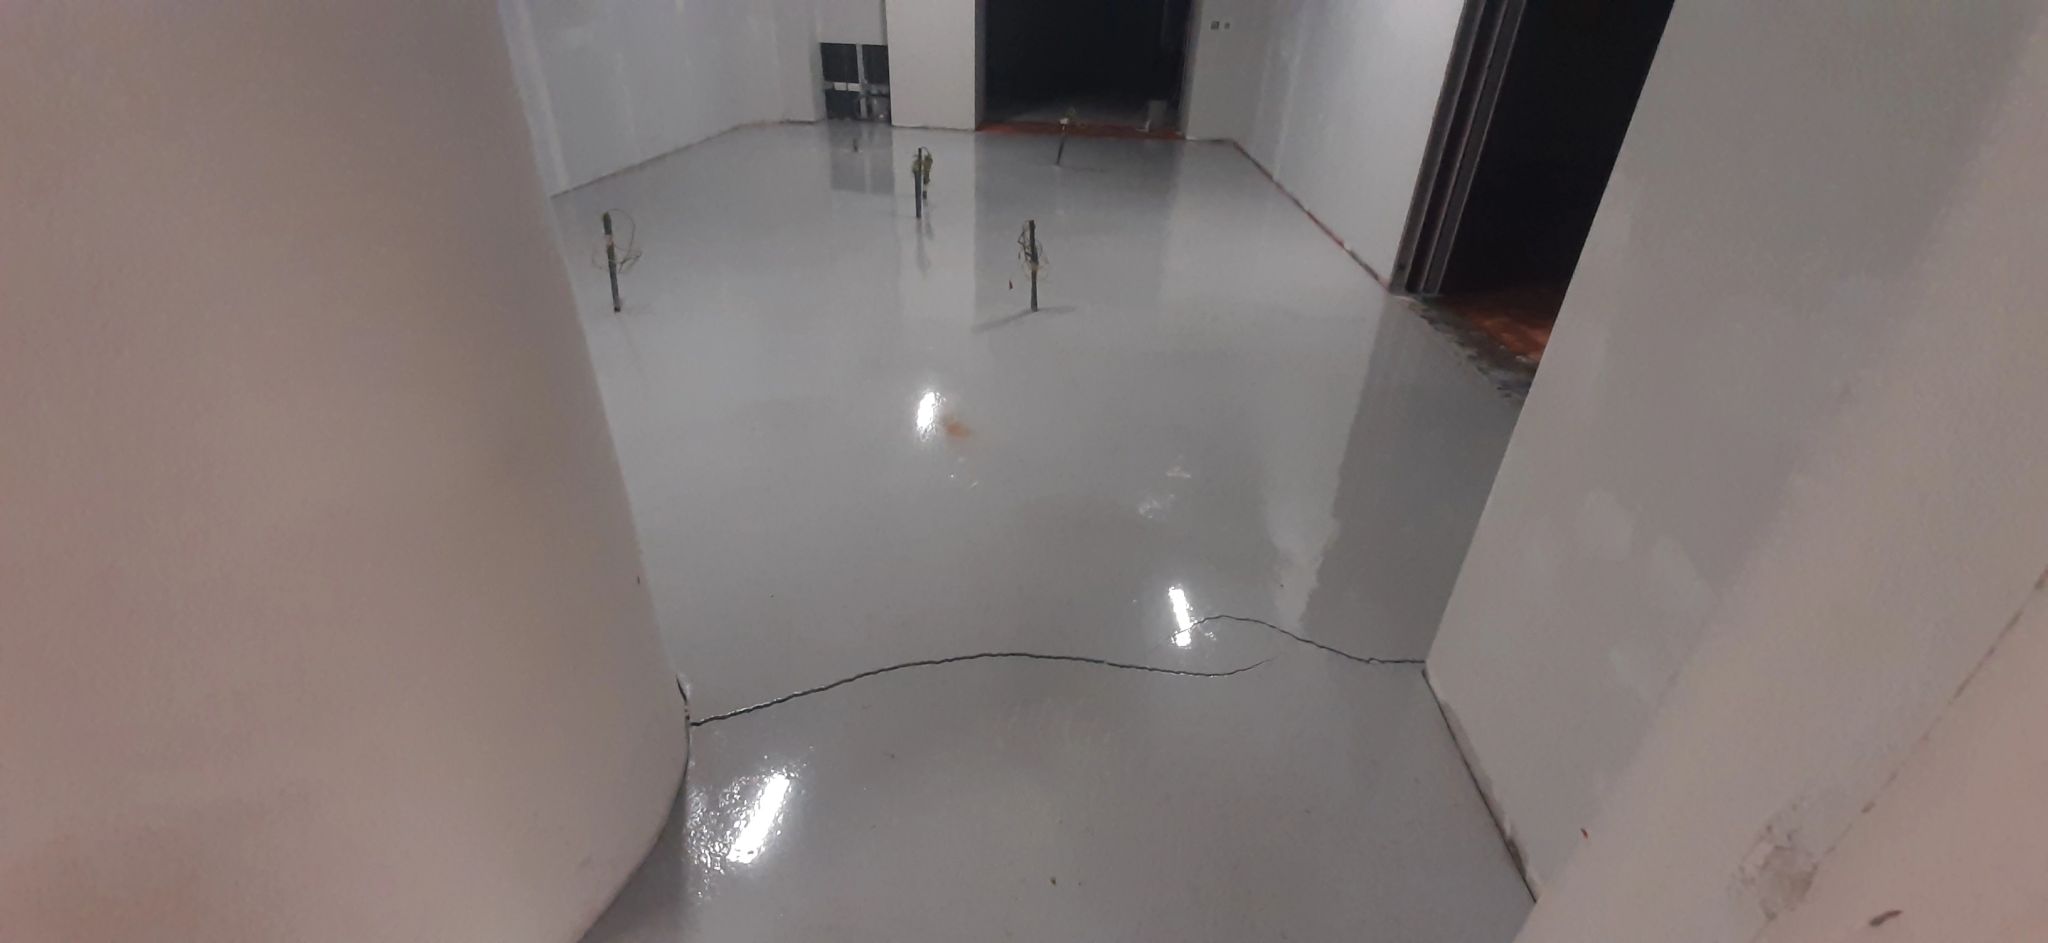
Epoxy Cracks

 Epoxy Cracks

1. What Causes Epoxy Cracks?

  • Epoxy is a durable and strong material, but cracks can form due to various factors, including:

  • Thermal Expansion & Contraction – Temperature fluctuations cause expansion and contraction, leading to stress cracks.

  • Improper Mixing Ratios – Incorrect resin-to-hardener ratios can make epoxy brittle or too soft, leading to cracking.

  • Surface Movement or Flexing – If the surface underneath the epoxy shifts or flexes, the rigid epoxy layer may crack.

  • Curing Issues – Applying epoxy in extreme temperatures or humidity can result in improper curing and eventual cracking.

  • Impact or Heavy Loads – Dropping heavy objects or placing excessive weight on epoxy surfaces can cause cracks.


2. Different Types of Epoxy Cracks

  • Hairline Cracks – Thin surface cracks that may not be structural but can affect aesthetics.

  • Spiderweb Cracks – A network of small cracks caused by excessive curing stress.

  • Deep Structural Cracks – Large cracks that go through multiple epoxy layers, often due to weak substrate or poor bonding.

3. How to Identify Structural vs. Superficial Epoxy Cracks

  • Superficial Cracks – Only affect the topcoat and don’t compromise structural integrity.

  • Structural Cracks – Penetrate deeply into the epoxy and may indicate underlying substrate issues.


Preventing Epoxy Cracks

1. Proper Surface Preparation:

  • Ensure the substrate is clean, dry, and free from contaminants like oil, dust, or grease.
  • Use a primer to improve adhesion and reduce the risk of cracks forming later.
  • Check for moisture content in concrete surfaces, as excess moisture can weaken epoxy adhesion.

2. Best Practices for Mixing and Applying Epoxy:

  • Follow manufacturer's instructions for the correct resin-to-hardener ratio.
  • Mix thoroughly but avoid excessive stirring, which can introduce air bubbles that lead to weak spots.

  • Apply in thin, even coats to prevent stress buildup.

3. Controlling Environmental Conditions:

  • Apply epoxy in a controlled temperature environment (usually between 60-80°F or as per product guidelines).
  • Avoid high humidity levels, which can cause blushing and weak curing.

Repairing Epoxy Cracks

1. DIY Fixes for Small Cracks:

  • For hairline cracks, lightly sand the surface, clean it, and apply a thin epoxy seal coat.

  • Use CA glue or a clear resin filler for minor cosmetic repairs.

2. Professional Repair Techniques for Large Cracks:

  • Regrind and Reapply – Remove the cracked section, sand, and recoat with fresh epoxy.
  • Flexible Sealants – In cases where movement causes cracks, use flexible epoxy fillers to allow slight movement.
  • Injection Method – For deep cracks, inject epoxy resin into the crack before refinishing the surface.

3. Best Epoxy Crack Fillers & Repair Products:

  • Epoxy Putty – Ideal for filling small cracks and holes before applying a new topcoat.
  • Flexible Epoxy Sealants – Prevent re-cracking in areas with slight movement.
  • Self-Leveling Epoxy – Helps smooth out imperfections while reinforcing the surface.

Preventative Measures


• Use high-quality epoxy materials with proper mix ratios.

• Follow the manufacturer’s guidelines for curing temperature and time.

• Prepare the surface thoroughly before application.

• Apply epoxy in thin layers to avoid excessive heat buildup.

• Protect the epoxy from UV exposure and moisture.

• Ensure the structure supporting the epoxy is stable and rigid.

hashtag

Epoxy is strong, but cracks can form due to thermal expansion, improper mixing, surface movement, curing issues, or heavy loads. Types include hairline, spiderweb, and structural cracks. Prevent them with proper prep, mixing, and environmental control.

Waterproofing: Protecting Structures for a Lifetime

 🚧 The Science of Waterproofing: Protecting Structures for a Lifetime 🏗️


Water is both a life-giver and a silent destroyer in construction. Without proper waterproofing, buildings are vulnerable to cracks, dampness, corrosion, and structural failure over time. Whether it's a high-rise, bridge, basement, or terrace, effective waterproofing is the foundation of long-term durability.

🔍 Why Waterproofing is Essential in Civil Engineering

💧 Prevents Structural Damage: Water infiltration weakens concrete, leading to cracks and deterioration.

💧 Protects Reinforcement: Exposure to moisture causes steel reinforcement to corrode, reducing strength.

💧 Enhances Durability: Well-sealed structures require less maintenance and have a longer lifespan.

💧 Improves Indoor Air Quality: Prevents mold growth, which can lead to health hazards.

💧 Saves Costs: Early investment in waterproofing prevents expensive repairs in the future.

🔹 Common Waterproofing Methods & Their Applications

1️⃣ Cementitious Waterproofing

🔸 Best for: Basements, water tanks, swimming pools, bathrooms, bridges
🔸 Pros: Easy to apply, cost-effective
🔸 Cons: Limited flexibility; may crack with movement

2️⃣ Liquid Waterproofing Membranes

🔸 Best for: Terraces, balconies, bathrooms, roofs
🔸 Pros: Seamless, flexible, easy application
🔸 Cons: Requires careful surface preparation

3️⃣ Bituminous Waterproofing (Asphalt-Based)

🔸 Best for: Foundations, parking decks, roofs
🔸 Pros: Strong adhesion, UV-resistant
🔸 Cons: Can degrade under extreme heat

4️⃣ Polyurethane Waterproofing

🔸 Best for: Exposed areas like terraces, podiums, and bridges
🔸 Pros: Highly elastic, durable, and weather-resistant
🔸 Cons: Sensitive to moisture during application

5️⃣ Sheet Membranes (PVC, HDPE, TPO)

🔸 Best for: Basements, tunnels, large industrial roofs
🔸 Pros: Long-lasting, high tensile strength
🔸 Cons: Requires skilled installation

🔍 Common Causes of Waterproofing Failures & How to Avoid Them

❌ Poor Surface Preparation: Always clean and dry the surface before application.
❌ Cracks in the Structure: Use flexible waterproofing solutions that can bridge cracks.
❌ Improper Drainage Design: Ensure proper slope and water outlets to prevent pooling.
❌ Aging & Wear: Periodic maintenance and reapplication of coatings extend lifespan.

🚀 The Future of Waterproofing in Construction

With new advancements in nano-coatings, self-healing concrete, and smart membranes, waterproofing technology is evolving rapidly. As engineers, embracing these innovations will help us build stronger, safer, and more resilient structures for the future.

Tuesday, March 7, 2023

Soil Stabilisation And Types

Soil Stabilisation


Soil stabilization is the process of improving the engineering properties of soil to make it more stable. It is necessary when the soil available for construction is unsuitable for its intended purpose. In its broadest sense, stabilization includes techniques such as compaction, preconsolidation, drainage, and other processes. Generally, soil stabilization involves improving soil properties by blending and mixing it with other materials. A cementing agent or chemical is added to natural soil to achieve stabilization. The improvements typically include increased dry unit weight, enhanced bearing capacity, reduced volume change, and better performance of in-situ subsoils, sands, and various waste materials, all aimed at strengthening road surfaces and other geotechnical applications.

Soil stabilization helps reduce the permeability and compressibility of the soil in earth structures while increasing its shear strength. It is essential for enhancing the bearing capacity of foundation soils. The main objective of soil stabilization is to improve natural soils for constructing highways and airfields. This process utilizes a wide variety of additives, including lime, cement, and fly ash. Additional byproducts used in stabilization include lime-kiln dust (LKD) and cement-kiln dust (CKD). Various methods and materials can be used to stabilize soil, with the following types being common:

1. Lime Soil Stabilization:

Lime stabilization is achieved by adding lime to soil, which is particularly effective for stabilizing clayey soils. When lime interacts with the soil, there is an exchange of cations in the adsorbed water layer, leading to a reduction in the soil's plasticity. The resulting material becomes more friable than the original clay, making it more suitable for use as a subgrade. Lime stabilization improves both the density and bearing capacity of the soil.

2. Cement Soil Stabilization:

Cement soil stabilization involves mixing pulverized soil with Portland cement and water, then compacting the mixture to create a strong material. The cement contains active ingredients that facilitate the disintegration of soil particles while also helping to bond the soil. Other materials that may be added to the mixture include lime, calcium chloride, sodium carbonate, sodium sulfate, and fly ash. The amount of cement used varies depending on the type of soil being stabilized.

3. Bitumen Soil Stabilization:

Bitumen stabilization utilizes a non-aqueous system of hydrocarbons that are soluble in carbon disulfide, typically performed with asphalt as a binder. Inorganic soils that can be mixed with asphalt are suitable for bituminous stabilization. In cohesionless soils, asphalt binds the soil particles together, acting as a bonding or cementing agent.

4. Chemical Soil Stabilization:

In chemical soil stabilization, various chemicals are added to the soil, which react with the soil to change its structure. These chemicals seal the spaces between soil particles, preventing water from penetrating. Common chemicals used for soil stabilization include sodium chloride, calcium chloride, and sodium silicate.

5. Electrical Soil Stabilization:

Electrical soil stabilization is performed on clayey soils through a process known as electro-osmosis. In this method, a direct current is passed through the clayey soil, causing pore water to migrate toward the negative electrode (cathode). This occurs due to the attraction of positive ions (cations) in the water toward the cathode. The strength of the soil is significantly increased due to the removal of water. Electro-osmosis is an expansive method primarily used for the drainage of cohesive soils.

6. Thermal Soil Stabilization:

Thermal soil stabilization involves either heating or cooling the soil. Heating the soil reduces its water content, which in turn increases its strength. When soil is heated to high temperatures, irreversible changes occur that render the soil non-plastic and non-expansive. Conversely, when cooling the soil for stabilization, there may be a slight loss of strength in clayey soil due to increased interparticle repulsion. However, cooling the soil to the freezing point causes the pore water to freeze, thus stabilizing the soil.

Applications of Soil Stabilization:

  • Road Construction: Improves the load-bearing capacity of subgrades and base courses.
  • Foundation Support: Enhances the strength and stability of foundations, particularly in areas with weak soil.
  • Erosion Control: Vegetative and polymer stabilizations are used to prevent soil erosion, especially in slopes or coastal areas.
  • Landfills and Waste Disposal: Stabilization is used to create a stable surface for landfills, ensuring proper containment and avoiding contamination.

Friday, July 9, 2021

What Is Spalling Of Concrete

 What Is Spalling Of Concrete ?

Spalling of concrete refers to the chipping, cracking, or flaking off of the surface layer of concrete, typically caused by the deterioration of the material beneath the surface. It results in the exposure of the aggregate (gravel or sand) inside the concrete, leaving behind an uneven and unsightly surface. Spalling can also lead to structural damage if not addressed.

Spalling is caused by certain chemical reactions inside the concrete which lead to the formation of foreign products which are of high volume. These new products due to lack of space inside the concrete will increase the internal pressure. As a result, cracks are formed to release this pressure outside. 


Civil Insta

Causes Of Spalling Of Concrete

  1. Corrosion of Embedded Metals
  2. Inadequate Cover
  3. Freeze-Thaw Cycles
  4. High Temperature
  5. Alkali Aggregate Reactions
  6. Improper Curing
  7. Improper Water Content
  8. Sulphate Attack
  9. Chloride Attack
  10. Rough Finishes

1. Corrosion Of Embedded Metals

As described earlier, steel uses for the reinforcement, so the corrosion of the steel and other embedded material cause the deterioration of concrete. When steel rust the resultant corrosion occupies a large volume than the steel.

2. Inadequate Cover

Inadequate cover will increase the vulnerability of the reinforcement to the environment. Even the slightest crack on the surface will expose the reinforcement. When steel comes in contact with water and air, it corrodes. The products of the corrosion have high volume than that of steel causing high internal pressure and thereby causing spalling.

3. Freeze-Thaw Cycles:

In areas with cold climates, water trapped within the concrete can freeze and expand when temperatures drop. When this happens repeatedly, the concrete surface can spall off. This is a typical problem in regions subject to freezing and thawing conditions

4. High Temperature

Explosive spalling may occur during fire or when concrete is exposed to high temperature which causes high pore pressure developed by the oversaturation. High strength concrete is more vulnerable to failure under high temperature than that of normal strength concrete due to the increased brittleness.


5. Alkali Aggregation Reactions

When the alkali in the cement reacts with silica in the aggregate in the presence of water, it will from the alkali silica gel which is higher in volume than the conventional products of hydration.


6. Improper Curing

If concrete is not cured properly, it may not achieve the necessary strength and durability. Lack of proper curing can lead to surface defects, including spalling.

7. Improper Water Content

Low water content will reduce the workability and make it hard for compaction. This may lead to the formation of unintended air pockets which may later pave a way for crack formation. High water cement ratio will reduce the strength of the concrete thus making it more vulnerable to micro cracks and thereby spalling.

8. Sulphate Attack

It is caused by rich cement or the sulphate present in the atmosphere. The decomposition of the products of the hydration reaction leads to reduction in the strength of the concrete and in doing so causes spalling.

9. Chloride Attack

This occur in structures exposed to sea water. Chloride attack will directly cause corrosion to the steel reinforcement inducing the spalling concrete.

10. Rough Finishes

A rough finished surface structure tends to accumulate more water on the surface than a smooth surface finished structure. The rough finished structure will increase the seepage of water and may encourage spalling.

Repairing Concrete Spalling:

1. Surface Preparation:

The affected area must be cleaned and prepared by removing any loose concrete, debris, or rust. Typically, a wire brush, chipping hammer, or pressure washer is used for this process.

2. Remove Corroded Rebar:

If the underlying reinforcement is corroded, it must be cleaned or replaced. Corroded rebar should be sandblasted or wire brushed to remove rust, and any severely corroded sections may need to be replaced.

3. Apply a Bonding Agent:

A bonding agent is often applied to the clean surface to ensure that the repair material properly adheres to the existing concrete.

4. Patch the Spalled Area:

The spalled areas can be repaired using a concrete patching compound or a repair mortar. These materials are applied to the affected areas and smoothed out to match the surrounding surface. It's crucial to use the right type of repair material to match the original concrete's strength and durability.

5. Curing the Repair:

After the patching material is applied, it should be properly cured to allow it to set and harden. Curing helps the repair material achieve maximum strength and bond effectively with the existing concrete.

6. Surface Finishing:

Once the repair material has cured, the surface may need to be ground or polished to blend in with the surrounding concrete. If necessary, a sealant or protective coating can be applied to reduce the risk of moisture infiltration and further damage.

7. Reinforcement with Carbon Fiber:

In cases of significant structural damage, additional reinforcement using carbon fiber strips or mesh may be required to provide extra strength to the repaired area.

8. Prevention:

To prevent future spalling, it’s essential to address the root cause. This could include ensuring proper drainage, applying a concrete sealant, using corrosion-resistant reinforcement, and improving the quality of the concrete during the initial construction phase.

What is a Diaphragm Wall?

  What is a Diaphragm Wall?  A diaphragm wall acts as the backbone of deep excavations. It is a strong, reinforced concrete wall constructed...