Saturday, March 1, 2025

GREEN BUILDING


According to United Nations (UN) data, by 2050, approximately 68% of the global population is projected to reside in urban areas. Despite cities occupying just 3% of the Earth's surface, they account for 78% of global energy consumption and generate 60% of greenhouse gas emissions. Recognizing the critical need to address these challenges, the UN introduced the New Urban Agenda in 2016. This framework provides guidance for countries to navigate urbanization processes and create cities that are more habitable, inclusive, healthy, resilient, and sustainable.

The New Urban Agenda emphasizes integrated urban planning, efficient resource utilization, and the promotion of social equity to address the multifaceted challenges of rapid urbanization. By fostering collaboration between governments, communities, and private entities, the agenda seeks to balance economic development with environmental sustainability and social inclusivity, ensuring a higher quality of life for urban populations worldwide.

Green building, also known as sustainable building, refers to the practice of designing, constructing, and operating buildings in a way that reduces environmental impact and enhances the quality of life for occupants. Below are the key benefits of green building:

1. Environmental Benefits

Energy Efficiency: Green buildings use energy-efficient systems and renewable energy sources, reducing greenhouse gas emissions.

Water Conservation: Efficient water systems, rainwater harvesting, and water recycling reduce water consumption.

Waste Reduction: Promotes recycling and use of sustainable materials, reducing construction and operational waste.

Biodiversity Protection: Minimizes land degradation and promotes green spaces to support local ecosystems.

2. Economic Benefits

Lower Operating Costs: Energy- and water-efficient systems lead to lower utility bills over the building's lifecycle.

Increased Property Value: Green-certified buildings are often valued higher in the market.

Enhanced Durability: Sustainable materials often result in lower maintenance and replacement costs.

3. Health and Well-Being

Improved Indoor Air Quality: Use of non-toxic materials and better ventilation reduces exposure to pollutants.

Natural Lighting: Increased daylighting enhances productivity and mental health for occupants.

Thermal Comfort: Well-designed buildings maintain comfortable indoor temperatures.

4. Social Benefits

Community Development: Promotes sustainable urban planning and improves living standards.

5. Climate Resilience

Adaptability to Climate Change: Designed to withstand extreme weather conditions, reducing the risk of damage.

Reduced Carbon Footprint: Sustainable practices significantly lower carbon emissions during construction and operation.

6. Technological Advancement

Encourages innovation in renewable energy technologies, energy-efficient appliances, and sustainable construction methods.

HOW TO CALCULATE THE QUANTITY OF HOLLOW CONCRETE BLOCKS AND MORTOR IN WALL

Given,

Length of Wall = 6 m

Height of wall  = 3 m

Mortar Ratio    = 1:5

Thickness of Mortar = 25 mm

Size of Block = 400 mm x 150 mm x 200 mm


Solution:

Volume of Wall = L x B x H

                           = 6 x 0.15 x 3

                           = 2.7 Cum.


Volume of 1 Hollow Block = 0.4 x 0.15 x 0.2

                                                  = 0.012 Cum


Volume of 1 Hollow Block with Mortar = 0.425 x 0.15 x 0.225

                                                                               = 0.014 Cum.


Number of Hollow Blocks =                    Volume of Wall               

                                                Volume of 1 Hollow Block with Mortar

                                            = 2.7 / 0.014

                                            = 192.85

                                            = 193 Blocks.


Total Volume of Block = Number of Blocks x Volume of 1 Block

                                      = 193 x 0.012

                                      = 2.136 Cum


Volume of Mortar = Volume of Wall - Total Volume of Block

                               = 2.7 - 2.316

                               = 0.384 Cum ( Wet Volume)


Now convert Wet Volume in Dry Volume

Dry Volume of Mortar = 0.384 x 1.33  

                                              = 0.51 Cum.


Volume of Cement = ( Dry Volume x Ratio of Cement x Density of Cement) / Sum of Ratio

                                = ( 0.51 x 1 x 1440 ) / 6 

                                = 122.4 Kg

Cement in Bags     = 1224.4 / 50

                                = 2.4 Bags


Volume of Sand  = ( Dry Volume x Ratio of Sand ) / Sum of Ratio

                                  = ( 0.51 x 5 ) / 6 

                                 = 2.55 Cum

Sand in CFT       = 2.55 x 35.3147

                                = 15.008 CFT.

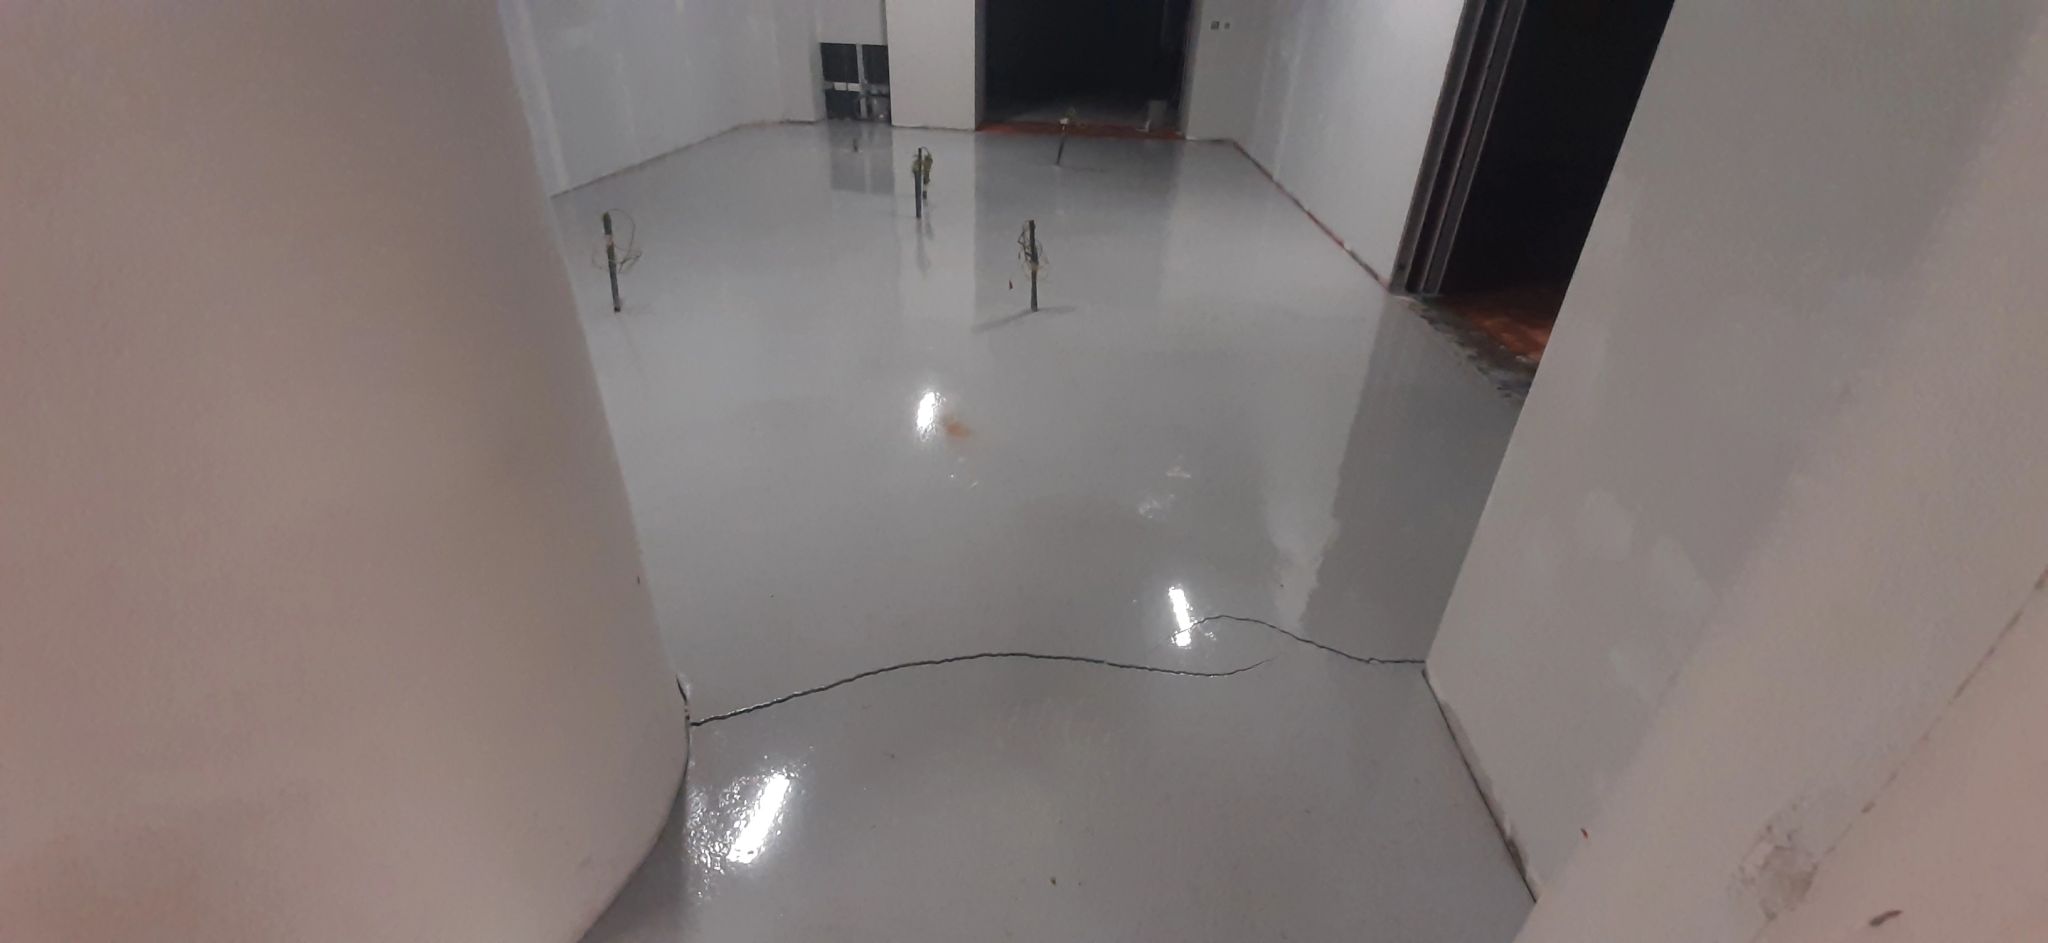
Epoxy Cracks

 Epoxy Cracks

1. What Causes Epoxy Cracks?

  • Epoxy is a durable and strong material, but cracks can form due to various factors, including:

  • Thermal Expansion & Contraction – Temperature fluctuations cause expansion and contraction, leading to stress cracks.

  • Improper Mixing Ratios – Incorrect resin-to-hardener ratios can make epoxy brittle or too soft, leading to cracking.

  • Surface Movement or Flexing – If the surface underneath the epoxy shifts or flexes, the rigid epoxy layer may crack.

  • Curing Issues – Applying epoxy in extreme temperatures or humidity can result in improper curing and eventual cracking.

  • Impact or Heavy Loads – Dropping heavy objects or placing excessive weight on epoxy surfaces can cause cracks.


2. Different Types of Epoxy Cracks

  • Hairline Cracks – Thin surface cracks that may not be structural but can affect aesthetics.

  • Spiderweb Cracks – A network of small cracks caused by excessive curing stress.

  • Deep Structural Cracks – Large cracks that go through multiple epoxy layers, often due to weak substrate or poor bonding.

3. How to Identify Structural vs. Superficial Epoxy Cracks

  • Superficial Cracks – Only affect the topcoat and don’t compromise structural integrity.

  • Structural Cracks – Penetrate deeply into the epoxy and may indicate underlying substrate issues.


Preventing Epoxy Cracks

1. Proper Surface Preparation:

  • Ensure the substrate is clean, dry, and free from contaminants like oil, dust, or grease.
  • Use a primer to improve adhesion and reduce the risk of cracks forming later.
  • Check for moisture content in concrete surfaces, as excess moisture can weaken epoxy adhesion.

2. Best Practices for Mixing and Applying Epoxy:

  • Follow manufacturer's instructions for the correct resin-to-hardener ratio.
  • Mix thoroughly but avoid excessive stirring, which can introduce air bubbles that lead to weak spots.

  • Apply in thin, even coats to prevent stress buildup.

3. Controlling Environmental Conditions:

  • Apply epoxy in a controlled temperature environment (usually between 60-80°F or as per product guidelines).
  • Avoid high humidity levels, which can cause blushing and weak curing.

Repairing Epoxy Cracks

1. DIY Fixes for Small Cracks:

  • For hairline cracks, lightly sand the surface, clean it, and apply a thin epoxy seal coat.

  • Use CA glue or a clear resin filler for minor cosmetic repairs.

2. Professional Repair Techniques for Large Cracks:

  • Regrind and Reapply – Remove the cracked section, sand, and recoat with fresh epoxy.
  • Flexible Sealants – In cases where movement causes cracks, use flexible epoxy fillers to allow slight movement.
  • Injection Method – For deep cracks, inject epoxy resin into the crack before refinishing the surface.

3. Best Epoxy Crack Fillers & Repair Products:

  • Epoxy Putty – Ideal for filling small cracks and holes before applying a new topcoat.
  • Flexible Epoxy Sealants – Prevent re-cracking in areas with slight movement.
  • Self-Leveling Epoxy – Helps smooth out imperfections while reinforcing the surface.

Preventative Measures


• Use high-quality epoxy materials with proper mix ratios.

• Follow the manufacturer’s guidelines for curing temperature and time.

• Prepare the surface thoroughly before application.

• Apply epoxy in thin layers to avoid excessive heat buildup.

• Protect the epoxy from UV exposure and moisture.

• Ensure the structure supporting the epoxy is stable and rigid.

hashtag

Epoxy is strong, but cracks can form due to thermal expansion, improper mixing, surface movement, curing issues, or heavy loads. Types include hairline, spiderweb, and structural cracks. Prevent them with proper prep, mixing, and environmental control.

Waterproofing: Protecting Structures for a Lifetime

 🚧 The Science of Waterproofing: Protecting Structures for a Lifetime 🏗️


Water is both a life-giver and a silent destroyer in construction. Without proper waterproofing, buildings are vulnerable to cracks, dampness, corrosion, and structural failure over time. Whether it's a high-rise, bridge, basement, or terrace, effective waterproofing is the foundation of long-term durability.

🔍 Why Waterproofing is Essential in Civil Engineering

💧 Prevents Structural Damage: Water infiltration weakens concrete, leading to cracks and deterioration.

💧 Protects Reinforcement: Exposure to moisture causes steel reinforcement to corrode, reducing strength.

💧 Enhances Durability: Well-sealed structures require less maintenance and have a longer lifespan.

💧 Improves Indoor Air Quality: Prevents mold growth, which can lead to health hazards.

💧 Saves Costs: Early investment in waterproofing prevents expensive repairs in the future.

🔹 Common Waterproofing Methods & Their Applications

1️⃣ Cementitious Waterproofing

🔸 Best for: Basements, water tanks, swimming pools, bathrooms, bridges
🔸 Pros: Easy to apply, cost-effective
🔸 Cons: Limited flexibility; may crack with movement

2️⃣ Liquid Waterproofing Membranes

🔸 Best for: Terraces, balconies, bathrooms, roofs
🔸 Pros: Seamless, flexible, easy application
🔸 Cons: Requires careful surface preparation

3️⃣ Bituminous Waterproofing (Asphalt-Based)

🔸 Best for: Foundations, parking decks, roofs
🔸 Pros: Strong adhesion, UV-resistant
🔸 Cons: Can degrade under extreme heat

4️⃣ Polyurethane Waterproofing

🔸 Best for: Exposed areas like terraces, podiums, and bridges
🔸 Pros: Highly elastic, durable, and weather-resistant
🔸 Cons: Sensitive to moisture during application

5️⃣ Sheet Membranes (PVC, HDPE, TPO)

🔸 Best for: Basements, tunnels, large industrial roofs
🔸 Pros: Long-lasting, high tensile strength
🔸 Cons: Requires skilled installation

🔍 Common Causes of Waterproofing Failures & How to Avoid Them

❌ Poor Surface Preparation: Always clean and dry the surface before application.
❌ Cracks in the Structure: Use flexible waterproofing solutions that can bridge cracks.
❌ Improper Drainage Design: Ensure proper slope and water outlets to prevent pooling.
❌ Aging & Wear: Periodic maintenance and reapplication of coatings extend lifespan.

🚀 The Future of Waterproofing in Construction

With new advancements in nano-coatings, self-healing concrete, and smart membranes, waterproofing technology is evolving rapidly. As engineers, embracing these innovations will help us build stronger, safer, and more resilient structures for the future.

What is a Diaphragm Wall?

  What is a Diaphragm Wall?  A diaphragm wall acts as the backbone of deep excavations. It is a strong, reinforced concrete wall constructed...